
New Domain
Recently I got one of those new .dev domain names so I could restart my web site with a fresh name and look. I bought romig.dev on March 1 as I didn't think there would be anyone out there that would snatch it up during the early access period. What are the odds? My gamble was a win.
New Site
I have been wanting to do a major overhaul of my personal web site for a long time. I also didn't want to just redo it either. I wanted to learn something new while building it.
I have been interested in learning a front-end JavaScript framework for a while and Vue.js had caught my attention. Its template syntax and component structure was easy for me to understand. I have worked with more template-driven structures before in my previous work (e.g. PHP & C#) so Vue's syntax of writing out my markup in HTML and plugging in my components where I wanted them seemed like home. This along with their superb documentation made me feel like I could learn a lot about a current front-end framework without getting a headache.
So I had a framework in mind. I just needed a good starting point in which to build a new site. Not only a web site, but I wanted to get back into blogging again. And build a new portfolio of my past work. And for it not be a pain in the butt to update later on.
JAMStack
I had heard cool things (online and at meetups) about building sites with the JAMStack model (JavaScript + API + Markup). The basic idea is the web site will always serve a static site even if the content is dynamic. With a traditional CMS, content is queried from a database server and brought down each time the content is requested, along with rebuilding the entire page from scratch.
 JAMStack Explained
With a static site generated from a JAMStack codebase, the dynamic content is pre-queried from its API source and static HTML files are created so when that content is requested, there is no need to contact the database. And depending on the front-end framework you're using, it's possible to only update the content area for the page changes instead of the entire page.
That's the basic gist of JAMStack but implementing it and its complexity depends on the framework and APIs you are going to use. All this, on top of the speed of serving static HTML as well as the extra security of not having any endpoints to exploit through the API queries, gave me a favorable impression on working with a JAMStack codebase.
Gridsome
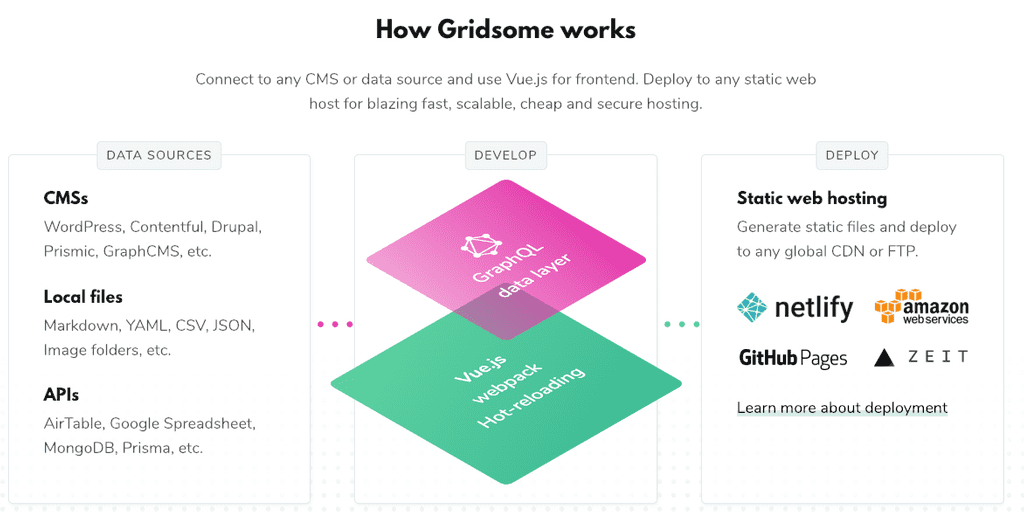
Then it came down to choosing a static site generator. There are a few that use the Vue framework but ultimately I decided on Gridsome. What got my attention with Gridsome is that it could retrieve data from different types of sources via GraphQL. I could write local Markdown files for my blog posts and dynamically create my resume by grabbing certain objects from a JSON file.
 Gridsome Development & Deployment Cycle
But I didn't know how to work with GraphQL. Fortunately, Gridsome comes with a playground to explore the GraphQL schema and experiment with writing my own queries. With some practice I was getting the hang of how it worked.
Structure
Below is a sample Gridsome project structure.
project-folder/
  gridsome.config.js
  package.json
└ blog/
    blog-post.md
└ src/
  └ components/
      Footer.vue
      NavMenu.vue
  └ data/
      resume.json
  └ layouts/
      Default.vue
  └ pages/
      About.vue
      Blog.vue
      Index.vue
  └ templates/
      Post.vue
    favicon.png
    main.js
└ static/
  └ assets/
    └ images/
Static pages in Gridsome are constructed from a Layout component which can bring in a component (from the pages folder) into a <slot /> within its template. And of course the Page can be made from individual reusable components. Dynamic pages that are sourced from APIs such as blog posts are made from their own components as specified from the typeName (shown in the code in the Getting the data section) within the templates folder.
Layout ← Page/Template ← Components
<!-- Layout -->
<template>
  <div>
    <header />
    <slot /><!-- Page or Template gets injected here -->
    <footer />
  </div>
</template>
Designing the layouts
Where to start? That is usually the question on my mind when I'm building an interface. Luckily Gridsome has a nice and clean starter layout that I could build from. Having this boilerplate was nice as I could see how pages were in relation to each other as I explained above.
 Gridsome Starter Layout
First, I did a pass on the header section (logo, navigation) and cleared out the body of the Index.vue page. I didn't quite know what I wanted on it yet until I got the rest of the pages set up. The navigation menu had a few iterations on how it would behave with responsive breakpoints and I feel it's in a good place now.
Then I created the Blog page (which would provide a paginated list of articles) and the corresponding Post template to show the article itself. I did the same for the Projects page that would house my past work as I had in my old portfolio. Each blog post and project is an individual Markdown file in its respective folder. Gridsome will automatically detect these files when it builds the static site and will route them accordingly.
I then made the About page and filled in the content in multiple passes as I went. The page for my resume was fun to build since I could encapsulate a bunch of it into separate components while passing the data to them from a single JSON source file.
A couple of extra components were an information card that appears at the very bottom of blog posts and project pages that contain a short blurb about me as well as the footer which houses links to my social media presence. What about pages that don't exist? Not to worry - I did not forget to create a custom 404 page.
I did a number of passes on making sure responsive behavior worked as it should including testing on an external device. I also did multiple refactorings and tweaks when I realized I could do certain things in a cleaner way.
Getting the data
Below is a bit from my gridsome.config.js file where I set up global meta data and installed plugins, specifically the @gridsome/source-filesystem plugin which handles accessing my Markdown files and their routing for the site.
module.exports = {
  siteName: "Adam Romig",
  siteUrl: "https://romig.dev",
  siteDescription: "Personal Site & Blog for Adam Romig",
  transformers: {
    remark: {}
  },
  plugins: [
    {
      use: "@gridsome/source-filesystem",
      options: {
        path: "blog/**/*.md",
        typeName: "Post",
        route: "/blog/:slug",
        remark: {
          externalLinksTarget: "_blank",
          externalLinksRel: ["nofollow", "noopener", "noreferrer"],
          plugins: [["gridsome-plugin-remark-shiki", { theme: "light_vs" }]]
        }
      }
    }
  ]
};
This plugin, along with the Gridsome Transformer Remark plugin (which parses the Markdown into HTML) and shiki (for applying syntax highlighting to code blocks) made keeping content & templates separate and easy to manage.
Then I could set up a GraphQL query for the listing page (pages/Blog.vue).
<page-query>
query Posts ($page: Int) {
  posts: allPost (sortBy: "date", order: DESC, perPage: 4, page: $page) @paginate {
    totalCount
    pageInfo {
      totalPages
      currentPage
      isFirst
      isLast
    }
    edges {
      node {
        id
        title
        excerpt
        date (format: "D MMMM YYYY")
        path
        cover
      }
    }
  }
}
</page-query>
That I could iterate through the results (using Vue's v-for directive) and create links to the articles themselves.
<div class="post-list">
  <div v-for="post in $page.posts.edges" :key="post.node.id" class="post-item" >
    <g-link :to="post.node.path" class="post-title">
      <span>{{ post.node.title }}</span>
    </g-link>
    <div class="post-date">{{ post.node.date }}</div>
    <p class="post-excerpt">{{ post.node.excerpt }}</p>
  </div>
</div>
The page that shows the article contents is generated from and its own query.
<page-query>
query Post ($path: String!) {
  post: post (path: $path) {
    title
    excerpt
    date (format:"D MMMM YYYY")
    content
    cover
  }
}
</page-query>
And injected into the appropriate template (Post.vue).
<template>
  <Layout>
    <section>
      <header>
        <g-image class="post-cover" :src="$page.post.cover" />
        <h2 class="post-title">{{ $page.post.title }}</h2>
      </header>
      <summary>
        <p class="post-excerpt">{{ $page.post.excerpt }}</p>
      </summary>
      <article>
        <p class="post-date">{{ $page.post.date }}</p>
        <div class="post-content" v-html="$page.post.content" />
      </article>
    </section>
    <InfoCard />
  </Layout>
</template>
Getting data from the JSON file for my resume page was as simple as importing the file into a JavaScript object.
import resumeJSON from "~data/resume.json";

export default {
  resume: resumeJSON.resume
};
Then either posting a field directly
<p>{{ $options.resume.summary }}</p>or iterating through a field's array and sending it to a component via props.
<div v-for="skillHeading in $options.resume.skills">
  <SkillCard :skillHeading="skillHeading" />
</div>
Hosting with Netlify
While I had started building the site, I still needed a place to host it. Luckily Gridsome has a few recommendations and I went with Netlify. The awesome part of deploying a JAMStack site is the continuous deployment portion which are git-triggered. Whenever I do a git push to update my repository on GitHub, the site is rebuilt with the changes I had recently made in my latest commit.
Deploying updates this way automates the process a lot since I don't have to fuss with doing a build command myself and sending the updated files in the dist folder manually over FTP.
Netlify also lets me set up a custom domain using the one I bought as well as allow for aliases. Additionally, I created a contact form that would route through Netlify and keep a record of submissions within their back-end as well as notifying me through email.
Conclusion
Please note that this article is not meant to be a tutorial on how to build a Gridsome site but more of how and why I built it without going into too many specifics. Though I do hope it does inspire you to try your own venture into creating a JAMStack site, whether it is built with Vue and/or Gridsome.
Creating this new web site with Vue & Gridsome has been a great learning experience. I cannot wait to practice more with Vue.js. I think this is the front-end framework I will learn a lot more about as I grow as web developer.
The source for this site can be found on its Github repository.