
The "To-Do" app, after "Hello World", is almost a rite of passage to write one when learning a front-end framework. I was looking to get more practice with Vue and Vuex and was wanting to try it at small scale first. Vuex is probably overboard for an app for tracking To-Do's but it's just for practice, so why not?
In this article, we'll build this app together.
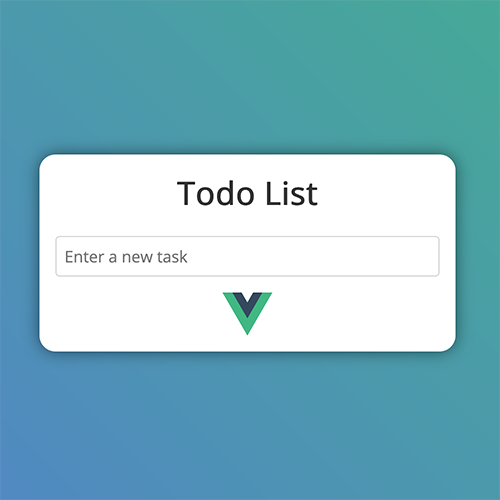
Live Demo: todo.romig.dev
Source Code: Github
Sections:
Prerequisites
Node.js
First you should have Vue CLI installed. This requires at least Node.js version 8.9. If you do not have Node.js installed, download the current version for your operating system.
If you do have Node.js installed, check its version:
$ node --version
v11.3.0
If your version is lower than v8.9, then update it to the latest:
$ npm install -g npm@latestVue CLI
I also will be using Vue CLI 3 to scaffold out the app before we start coding.
If you already have Vue CLI installed, check the version on it:
$ vue --version
3.5.3
If your version is lower than 3.x, remove the old installation of vue-cli and then install the latest:
$ npm uninstall -g vue-cli
.
.
.
$ npm install -g @vue/cli
Creating the Project with Vue CLI
Now that we're using the right versions of Node and Vue CLI, we can create our project.
In your terminal, change to the directory where you want your project folder to reside. Then run the vue create command to create the app folder:
$ cd ~/Documents/Github/
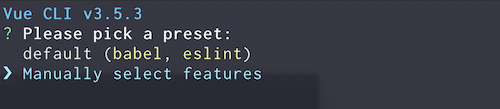
$ vue create todo-appYou will be presented with a menu to configure the project. I will choose "Manually select features" in order to get Vuex as a dependency.
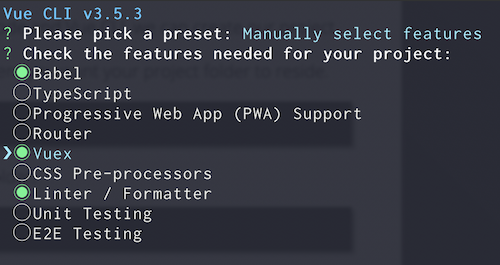
A list of features that are available to install with the project are listed. I have selected Vuex (by pressing the spacebar).
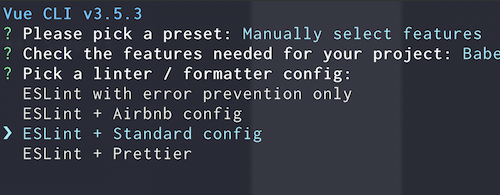
Pressing Enter/Return gives me a list of linting options. I will be choosing ESLint + Standard config. After pressing Enter/Return, I picked "Lint on save" and to place config for Babel, ESLint, etc in their own dedicated config files.
Vue CLI will churn as it creates the project folder and downloads dependencies.
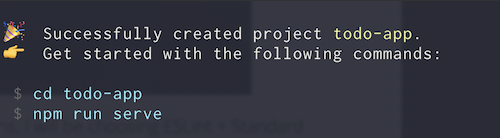
Now I can go into the todo-app folder it created and start the development server. We can go to the URL it shows (may be different from the screenshot) to see our app in action.
$ cd todo-app
$ npm run serve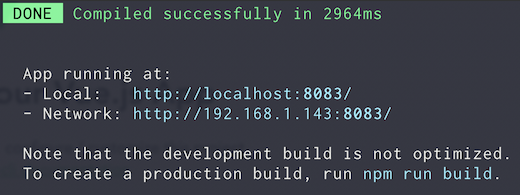
Quick Vuex Overview
Before we get coding, let's quickly explain the general idea behind Vuex and its role in state management.
In Vuex, we have something called a store which is a global object that contains four major things that it needs to manage state in our Vue app. Those things are:
- State: The object that holds our app's data.
- Getters: Functions that return back data that resides in the state.
- Mutations: Functions that directly mutate/change the state.
- Actions: Functions that call mutations. Actions can call multiple mutations, other actions, and even other asynchronous operations.
A user will interact with the Vue app and those interactions will trigger actions that will commit mutations on the state. After the state has been changed, Vue will re-render the affected components based on this new state.
Setting up the Vuex Store
The first step in using Vuex is deciding what data our app will need in the state. This app will only keeping tracking of a collection of to-do items so that's all we really need in our state.
Each item in our array should contain a few things: a unique ID number to differentiate them, a description of the task, and a flag to let the app know if the task has been completed.
Setting up the Store
In the src folder of the project, create a new folder called store.
Vue CLI puts the store.js file right in the src folder but I prefer to put it in the src/store folder for organizational purposes, though it can stay in src if one wants.
If you're like me, move the store.js file to the store folder. If not, just remember where yours is.
In the store folder, create a new folder called modules. Then create a new file in the modules folder called todos.js.
Editing "src/store/modules.todos.js"
State
We'll set up an empty array for the to-do items first.
export const state = {
  todos: []
};
Getters
Next there will be one getter function that will just return the todos array.
export const getters = {
  getTodos: state => state.todos
};
Mutations
Now we have to decide the mutations the state will go through. There are three changes to state that we will consider:
- Add a new item: After typing in a new to-do item, we should be able to add it to the array.
- Toggle an item's completion status: We should be able to toggle the completed status between true and false.
- Delete an item: We should be able to remove an item from the array when we don't need it anymore.
export const mutations = {
  ADD_TODO: (state, payload) => {
    const newTask = {
      id: payload.newId,
      task: payload.task,
      completed: false
    };
    state.todos.unshift(newTask);
  },
  TOGGLE_TODO: (state, payload) => {
    const item = state.todos.find(todo => todo.id === payload);
    item.completed = !item.completed;
  },
  DELETE_TODO: (state, payload) => {
    const index = state.todos.findIndex(todo => todo.id === payload);
    state.todos.splice(index, 1);
  }
};
Mutations also receive a payload, which is information needed to make the changes. For ADD_TODO, the payload is an object containing the next ID number available and the task description. TOGGLE_TODO and DELETE_TODO only need the ID number of the to-do item so that's all we'll pass to those mutations.
Here is what's going on in these functions:
ADD_TODO: A new to-do item object is created and then added to the beginning of the array (using the .unshift method) so the newest item appears at the top of the list.TOGGLE_TODO: The to-do item matching the ID passed in the payload is found and then we change itscompletedstatus by flipping its current boolean value.DELETE_TODO: The to-do item matching the ID passed in the payload is found and then we remove it (using the .splice method).
Actions
Finally we can create the action functions, which exist to call our mutation functions. Sometimes they can call multiple mutators or other actions, but for this app they'll only call their one specific mutation.
export const actions = {
  addTodo: (context, payload) => {
    context.commit("ADD_TODO", payload);
  },
  toggleTodo: (context, payload) => {
    context.commit("TOGGLE_TODO", payload);
  },
  deleteTodo: (context, payload) => {
    context.commit("DELETE_TODO", payload);
  }
};
We call the mutation function by using the context.commit() function. The first parameter of commit() is the name of the mutation and the second one is the payload. Our payload will be the payload given to the action functions themselves.
Implementing the Store
Editing src/store/store.js
Now in the actual store.js file, we can put these to good use.
import Vue from "vue";
import Vuex from "vuex";
import * as todos from "@/store/modules/todos.js";

Vue.use(Vuex);

export default new Vuex.Store({
  state: todos.state,
  getters: todos.getters,
  mutations: todos.mutations,
  actions: todos.actions
});
The todo.js module gets imported and the Vuex Store is defined using its properties as values.
Editing src/main.js
In the app's main.js file, we can make sure the store is imported and part of the Vue object. If you moved the store.js file to the store folder, be sure to update the path in the import statement. Otherwise, it should be fine.
import Vue from "vue";
import store from "./store/store";
import App from "./App.vue";

Vue.config.productionTip = false;

new Vue({
  store,
  render: h => h(App)
}).$mount("#app");
Building our Components
We're almost there. The store is probably the biggest part of the app. Now we'll get to building the user interface. We'll have two components (for listing the items & adding a new item) and the main component that contains the entire app.
First, in the components folder, delete the "HelloWorld.vue" file that Vue CLI put in there by default.
TodoList.vue
Create a new file in there instead called TodoList.vue.
Let's build a basic scaffold for our component first.
<template> </template>

<script></script>

<style></style>
Between the <script> tags, we'll add this code:
export default {
  computed: {
    todos() {
      return this.$store.getters.getTodos;
    }
  },
  methods: {
    toggleTodo: function(id) {
      this.$store.dispatch("toggleTodo", id);
    },
    deleteTodo: function(id) {
      this.$store.dispatch("deleteTodo", id);
    }
  }
};
A todos() function is created as a computed property and all it does is return the list of To-Do items from the store.
We also define methods for toggling and deleting items. They both call the dispatch() method to dispatch an action, passing in the id of the To-Do item affected as the payload.
Now for its template. Between the <template> tags, we can write the following:
<ul class="tasks">
  <li
    v-for="todo in todos"
    :key="todo.id"
    :class="{ completed: todo.completed }"
    class="task"
    @click="toggleTodo(todo.id)"
  >
    {{ todo.task }}
    <span class="delete" @click="deleteTodo(todo.id)">ⓧ</span>
  </li>
</ul>
The list gets created by the v-for directive in the <li> tags, looping through the todos array. We'll set up our methods for toggling/deleting to the click events of the list item & .delete span, respectively. Also a "completed" class is added to the list item if its completed property is true.
For styles, we can add the following between the <style> tags:
.tasks {
  padding: 0;
  list-style-type: none;
}

.task {
  padding: 10px;
  margin-bottom: 0.5rem;
  border: 0.5px solid #999;
  border-radius: 5px;
  color: #34495e;
  font-weight: bold;
}

.task:before {
  content: "\2002";
}

.task:hover {
  cursor: pointer;
}

.completed {
  text-decoration: line-through;
  color: #41b883;
}

.completed:before {
  content: "\2714";
}

.delete {
  display: block;
  float: right;
  color: #d22;
  width: 1.25rem;
  height: 1.25rem;
  text-align: center;
}
TodoNew.vue
Create a new file in the components folder called TodoNew.vue. Put in the same scaffolding that we did for TodoList.vue above.
<template> </template>

<script></script>

<style></style>
Between the <script> tags, we'll have this:
export default {
  data() {
    return {
      task: "",
      newId: 0
    };
  },
  methods: {
    addTodo: function() {
      this.$store.dispatch("addTodo", this);
      this.newId++;
      this.task = "";
    }
  }
};
The component's data just returns an object with the default values of a new To-Do item. Also there is a method addTodo that dispatches the "addTodo" action to call its mutator and then increment newId and reset the task description which will reactively clear out the text field.
Between this component's <template> tags:
<form @submit.prevent="addTodo">
  <input
    class="todo-input"
    type="text"
    placeholder="Enter a new task"
    v-model="task"
  />
</form>
This component only contains a form with one input tag. A new To-Do description is typed into the input and when the Enter/Return key is pressed, the addTodo method is called, creating the To-Do item in the store. It is also bound to the task property via v-model so when the text is changed by the user or underlying method, its changes are reflected in both places.
We'll add the input tag's styling inbetween the <style> tags:
.todo-input {
  font-family: "Open Sans", sans-serif;
  width: 100%;
  padding: 0.5rem;
  font-size: 1rem;
  outline: none;
  border-radius: 0.25rem;
  border-style: none;
  border: solid 1px lightgray;
  box-sizing: border-box;
}
App.vue
In the src folder, open up the App.vue file and replace its contents with the basic scaffolding.
<template> </template>

<script></script>

<style></style>
In the <script> tags, we'll add the two components we made by first importing them and then registering them.
import TodoNew from "@/components/TodoNew.vue";
import TodoList from "@/components/TodoList.vue";

export default {
  components: {
    TodoNew,
    TodoList
  }
};
In the <template> tags, we can flesh out this app.
<div class="container">
  <h1>To-Do List</h1>
  <div id="app">
    <div>
      <TodoNew />
      <TodoList />
    </div>
  </div>
  <img src="~@/assets/logo.png" class="vue-logo" alt="Vue.js Logo" />
</div>
The main application is injected into the div tag marked with the id of "app". We can add the TodoNew and TodoList components on top of each other within it. The image is just for flavor but notice the src attribute. The @ sign is interpreted as a module request and by default Vue CLI points that to the src folder, which the assets folder resides in. The location will be updated when the project is built and it will point to the right place.
We could also use the public folder for an image like this, but Vue CLI put that one in src/assets by default so we'll just access that one instead.
And we'll add a bit of CSS in the <style> tags for the final touch:
@import url("https://fonts.googleapis.com/css?family=Open+Sans");

html {
  font-family: "Open Sans", sans-serif;
  background: linear-gradient(45deg, #5189c1 25%, #41b883);
  height: 100%;
  color: #333;
}

body {
  display: flex;
  height: 100%;
  margin: 0;
}

.container {
  width: 24rem;
  margin: auto;
  background-color: white;
  border-radius: 1rem;
  padding: 1rem;
  box-shadow: 0 0 1rem rgba(0, 0, 0, 0.5);
}

h1 {
  text-align: center;
  margin-top: 0;
}

.vue-logo {
  display: block;
  width: 50px;
  margin: 0 auto;
}
The App is Complete
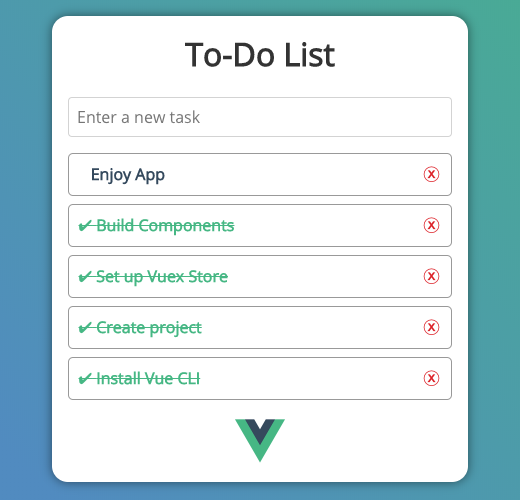
And we should be done! Go ahead and check the URL where the development server is running.
You should be able to type a new task into the text box and it should appear in the list below it when the Enter/Return key is pressed.
When the list item is clicked once, its color should change to green and get a strike-through. Clicking the ⓧ icon on an item should remove it from the list.
I hope this all went well and it was easy to understand. There are possible improvements I could make, of course. I'm always learning and it is a constant process. Never stop!
Demo
Live Demo: todo.romig.dev
This project's source code can be found on Github.